Wednesday, June 30, 2010

Meat Candy!


Well, it's Wednesday! This is one of my favorite days of the week at The Tyler Place! Service went smooth as usual and now it's time for sausage! Making sausage at home or in a restaurant can be a very surreal experience. Once you get involved, your brain shuts out any ambient noise and enjoys the experience just as much as your hands do. Making sausage can be a little difficult when just starting out, but don't fret! The learning curve is very steep. My first few times making these little bundles of joy was confusing. The first step in making sausage is to have the right equipment. Many people go for the low budget countertop hand press, or worse, the Kitchen Aid sausage attachment. These products will produce sausage, but produce more stress than it's worth. Try checking out Amazon.com for your sausage maker. I purchased both of mine through them and saved my bank account from extinction. A five pound press will run about $130. and the larger fifteen pound press is $270. These numbers are attractive considering that the same machine through a specialty company will cost double. A meat grinder is another "must-have" device for sausage. I have the meat grinder attachment for my Kitchen Aid to help me.

Once you have the sausage machine of your choice it's time to buy casings. You have to buy these from a specialty company. I use natural casings from sausagemaker.com. A large container of casings will net you about 100 pounds of fresh sausage. If you take care of your casings they will last until the apocalypse. Just be sure to salt the leftover casings heavily and refrigerate. I love sheep casings at 1/4" for breakfast sausage or merguez, and hog casings at 1 1/2-2" for grilling sausages. Today I made sweet and hot Italian sausage for our weekly cookout at The Tyler Place.

Start out by stopping by your local butcher and picking up some fresh pork shoulder or butt with skin on. While you're there see if you can get your hands on some fresh pork belly or fatback. Don't be intimidated by breaking down your own meat. It's a very satisfying feeling making these sausages from start to finish without help from the corporate farms. Start by slowly breaking down the shoulder or butt with a sharp knife and remove the skin and bone. If possible, try to scrape any of the subcutaneous fat that my be attached to the skin. You can't have great sausage without the fat! Cut the meat and fat pieces into cubes and refrigerate. It's important to keep the meat cold. If you were able to buy fatback or belly the ratio I use is for every four pounds of meat add one pound of fat. Set up your grinder and process the fresh pork and fat together and immediately refrigerate. Here is the ingredient list for hot and sweet Italian sausage.

Hot Italian Sausage

-4.5 lbs Pork Shoulder or Butt
-1 lb Fatback or Belly
-3 Tablespoons Kosher Salt
-2 Tablespoons Sugar
-2 Tablespoons Fennel Seed
-1 Tablespoon Coriander Seed, Toasted
-3 Tablespoons Hungarian Paprika
-4 Tablespoons Fresh Oregano
-4 Tablespoons Fresh Basil
-2 Tablespoons Red Pepper Flakes
-1/2 Teaspoon Cayenne Pepper
-2 Teaspoons Ground Black Pepper
-1/4 Cup Red Wine
-3/4 Cup Cold Water

Sweet Italian Sausage

-4 lbs Pork Butt or Shoulder
-1 lb Fatback or Belly
-3 tablespoons Kosher Salt
-2 Tablespoons Sugar
-2 Teaspoons Chopped Garlic
-2 tablespoons Fennel Seeds
-2 Teaspoons Black Pepper
-2 Tablespoons Sweet Paprika
-3/4 Cup Ice Water
-1/4 Cup Port

Have your spices scaled out before mixing with your meat mixture. This will save a lot of time and eliminate mistakes. Place the correct amount of meat in a mixing bowl and use your fingers to incorporate the spice and the meat. For larger batches a Kitchen Aid mixer will come in handy! Once the spice is mixed put the meat back in the refrigerator.

Now it's time to rinse casings! Carefully pull casings out of the bundle they give you. Don't worry, it may look like a time consuming project but it's not. Pull individual casings until they stop and cut. Pretty easy! Run cold water around them to remove any packing salt. Find the opening at either end and pass water through the casing. Leave a little water inside the casing to ease the threading process. Fill the canister with sausage mix! This is the point where I like to have a glass of wine!
Once you have one length of casing on the extruder, and the cylinder full of meat start to crank the handle and fill the casings. Use your fingers to control the flow of casing being applied. Occasionally stop and wind the sausage up.
Now that you're finished take a deep breath! If you have friends over you will all be laughing your asses off! This is the perfect rainy day kitchen project with friends! Think about the size of the link you want. I use a piece of tape on the countertop to help me with this. When you're first starting out go slow! Pinch the size of the link and roll it away from you. Move up to the next and roll it towards you. Repeat this over and over again until you are finished.
Use a pair of scissors to separate the individual links. They freeze well, so don't feel bad about making too much.
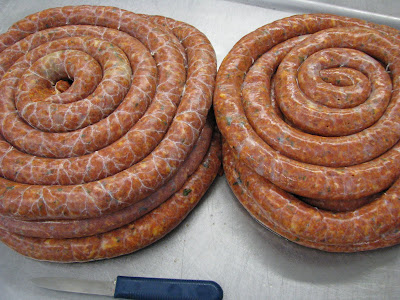
Let the sausage rest for a little while before cooking. The meat and the casings have been through a lot! Every time you make sausage you will become a little faster each time. I have made it so many times that I crank the handle as fast as I can. You'll be there someday! Next time you walk through the supermarket and see those sad excuses of sausage you can feel good knowing that you can produce a product that these big corporations can't touch! Enjoy! Email me if you have any questions!

Cheers!

Tuesday, June 29, 2010

Brine, Cure and Bunnies!


Today was a particularly fun day on the line. My prep guy had a touch of the beer flu so he went home. I quickly rearranged my day and made the most of the little time I had. This kind of pressure is where I thrive! Last week we brought in corned beef to try for Sunday hot sandwiches. I thought they were pretty good but were way too commercial. I have made fresh corned beef from scratch many times in the past with outstanding results. Accuracy with your measurements and unlimited patience make for great corned beef! It's pretty easy too!! First I had to make my pickling spice. The store bought variety is ok, but a little too bitter. Who knows how old that stuff really is. We don't have the equipment to do any carbon dating so making your own spice mix is the only way to be sure of freshness.

Pickling Spice
-2 Tablespoons Black Peppercorns
-2 Tablespoons Mustard Seeds
-2 Tablespoons Coriander Seeds
-2 Tablespoons Red Pepper Flakes
-2 Tablespoons Allspice Berries
-1 Tablespoon Mace
-2 Cinnamon Sticks, Crushed
-24 Bay Leaves, Crumbled
-2 Tablespoons Whole Cloves
-1 Tablespoon Ground Ginger

When you have the spice mix complete, pour it into a large saute pan and toast over high heat. Be sure to keep the spice moving. There is nothing worse than watching your ingredients go up in smoke! Put it in a sealed container and that's it! Easy!

This next step can be skipped if you have a problem with sodium nitrate. At home I never use this. In a restaurant setting like this you almost have to. This will turn the beef brisket that bright pink color that people associate with corned beef. Without this, the meat is brown but still very flavorful.

Next time you are at the store pick up some fresh brisket. It is a relatively inexpensive cut of meat that is way too under-appreciated. If you can, pick up enough to equal five pounds. Making the brine is very easy and a lot of fun.

Corned Beef Brine

-1 Gallon of Water
-2 Cups Kosher Salt
-1/2 Cup Sugar
-5 Teaspoons Sodium Nitrate
-3 Garlic Cloves, Crushed
-2 Tablespoons Pickling Spice
-1 5 lb. Beef Brisket


Mix everything together in a large stockpot. Bring everything to a boil. As soon as this happens remove it from the heat. Let the brine sit until it is room temperature. Take your brisket and put it in a container large enough to hold it and the brine. Pour the brine over the meat, cover tightly and refrigerate for five days.

After five days have gone by, take the meat out of the brine and rinse with cold water. Put the brisket in a large pot and cover with water. Add two tablespoons of pickling spice to the water. Bring everything to a boil and lower the heat to a simmer for 3 1/2 hours. If the water gets low and exposes the meat just fill it back up. You will be very happy with the results!

Cooking Corned Beef
-1 Large Pot
- Enough Water to Cover the Meat
-2 Tablespoons Pickling Spice
-3.5 Hours
-Hungry People!

Always remember to slice the corned beef against the grain. You can also refrigerate the meat overnight, cut it into cubes, and mix it with home fries and tarragon. Top it with a poached egg. Trust me, you will definitely melt faces with this one!


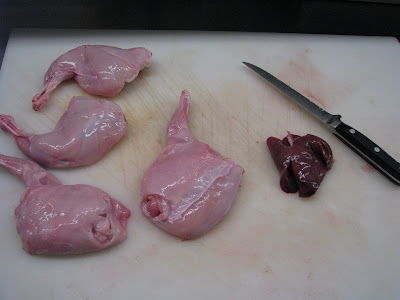
Everyday in our kitchen I like to give the staff something special. I appreciate their hard work and like to surprise them any chance I get. Today I found a whole fresh rabbit! Oh, the possibilities!
Adjusting my time to have everything ready for service, I quickly went to work! I removed both legs and split the body in two. I carefully removed the ribcage, liver, heart and kidneys.
I needed to fill the split body with something! But what? I remember seeing a pile of fresh rainier cherries in the walk-in! It happened to be sitting right next to five cases if crimini mushrooms! Our pastry chef thought it was a great match so I had to do it!
I quartered 30 mushrooms and sliced one shallot and put it in a small stockpot with a teaspoon of Kosher salt. The mushrooms began to release their liquid and mix with the shallot. After a few minutes I gave the mixture .25 cup splash of Marsala. I let the liquor cook down and added the cherries and currants.
Since this was a stuffing, I needed to bind it with some Panko. I removed the stuffing from the heat and adjusted the seasonings. I spooned the stuffing into the deboned sections of the rabbit, and tied it with butchers twine. I grabbed another pot and brought it up to temperature to sear all sides of the rabbit sections, and deglazed with white wine. When the wine reduced enough, I added two cups of chicken stock.


I covered the rabbit tightly and braised for 40 minutes. While the rabbit was braising, I cooked off some wild rice and haricot verts. The rabbit was finally done! I strained the cooking liquid and brought it back to a boil until reduced by half. Next, I swirled in three tablespoons of butter to deepen the flavors. The dish came out great!

Everyone was happy! Sometimes it's fun being the lone gunman on the line! Well, that's enough for today. Fresh sausages are on the agenda for tomorrow!

Cheers!

Sunday, June 27, 2010

Burlington Wine and Food Festival


Yesterday was the first annual Burlington Wine and Food Festival! I have to say that I was pretty excited at the notion of a big tent loaded with local cheese, bread and lots of wine. These types of events are right up my alley! Before getting into the wine, I wanted to sample some of the enormous piles of fresh sliced bread in front of me. The local bakers were out in full force! Klingers, which is a Burlington staple featured their cheddar jalapeno bread. I hovered in front of their table for far too long. It was very good, but I figured I can do better.

Next was August First Bakery and Cafe. They also featured a cheddar jalapeno that blew me away! Klingers? What's that? It had the most unbelievable texture ever! If that wasn't good enough, try their kalamata olive.! It was life changing! Every ingredient was in harmony.
Just by chance I transported a piece of their olive bread to the Willow Creek Farm table. This bread with their feta cheese was an instant match. It doesn't get any better than this! My next day off is this Tuesday. You know where I will be!! Wait!! There's wine too!!!

I worked the tent like a pro! It's impossible to have too many favorites....Right?

I had a great time and saw some old friends in the process. What could be better! I think the wine and food festival was a success for their first year. Can't wait for the next!

Cheers!

Thursday, June 24, 2010

Back in the day!


So far this week has been pretty relaxing. The weeks are starting to tick by and every day becomes a carbon copy of the previous. This has given me a lot of time to remember past restaurants and why I was there. I have been laughing to myself at work thinking about my first job in the kitchen. Not too many kids in high school can call themselves a head chef! I laugh at this because Ponderosa Steak House is definitely not known for their extraordinary cuisine. I think I cut every finger and burned both arms on my first week. I felt horrible! Counting the cockroaches that crawled past my station was my only entertainment! Fortunately, for humanities sake, the building was bulldozed ten years ago.

I tried many times to find another avenue for my life without belonging to a kitchen. For a while I was a handyman at The Bridges Resort in Warren, Vermont. What was I thinking!! Let's just say that everyday was a first day! I figured my job title should be the un-handyman. That job was short lived. I had to get back into the kitchen at all costs! During my last week I was mowing grass by the entrance and noticed a help wanted sign across the street at Miguel's Stowe Away. I left that day and started working the line again! WooHoo!! The crew was great! All of my dearest friends are the original staff. After all these years we all still find time to get together, cook amazing food, and laugh our asses off at the antics that took place! Kevin, Jesse, Chad, Sarah, Paulo, and Pookie you all mean the world to me.

This was my jumping off point in the cooking world. Seeing your creation on a grease pen specials board was very empowering! As with all restaurant jobs they eventually come to an end. I was moving up the ladder quickly. Probably too quick for my own good! So I moved to Park City Utah with friends. One day after arriving I landed a sous chef position at Loco Lizard Cantina. This place wasn't even open yet! It was an empty lot with a desk in the middle. This was my first chance to actually have input into the menu. Chuck Isble, who was the chef loved the energy I brought to the menu and the kitchen. I could not wait to meet the rest of the staff and see what we can do! I slept for about two hours the night before our first prep week. Riding to work that morning I was feeling strong until I saw the restaurant sign. Then I remember feeling this unbelievable wave of terror! What if I fail, what if the crew are scumbags, what if the food sucks...Ahhhh! Needles to say I was a wreck when I got out of the car. As usual I tend to over think scenarios and all that worrying was for nothing. Wheew! The crew was skilled and the raw product was very nice. The only thing I never saw coming was that everyone in the kitchen spoke Spanish! Nobody spoke a word of English! What the @$#*!! I'm in charge of all these people? I ask for tomatoes and they bring me pies! I learned kitchen Spanish FAST! Now I could communicate with them and this made them want to learn English. Win-win! We had a great time in there! I was doing this six days a week and working ski patrol at The Canyons Resort five days a week. How the hell did I pull that off?

Park City life was too good to me so I had to move on! Vermont was calling me back. I applied to a Relais & Chateaux property in Warren Vermont. I was hired over the phone that day! The Pitcher Inn was my first foray into the fine dining world. This was a notoriously hard kitchen. The kitchen crew were all professionals. At this point in my life I was not culinary trained. Yes, I did have experience, but knowing the theory behind the recipes was what I lacked. I had to eat, sleep and breathe high end cuisine. My first month was very difficult. I thought Susan Shickler, our chef, hated me! I had to prove myself and fast. I gained the respect of my co-workers in no time and my confidence was growing by the minute. I learned so much from watching Sue. Most of the way I prepare food today come from this experience. Six years ticked away pretty fast! I was there for the ups, downs, good and bad. To this day I feel fortunate to have this unique experience. I called Sue recently to thank her for all of the hard work and time she put in showing me how to make food look sexy. Thanks again chef!

I still needed more! Working at The Pitcher Inn full time and doing per diem catering work was not enough. How about culinary school! I can't think of a better way to achieve my goal. I embraced school while I was there. I took advantage of every seminar and demonstration. The chef instructors took notice of how I worked. They knew I was on their level. I was given the opportunity to prove this by testing out of my first year. The test was a blind basket cook-off. The instructors would watch me prepare the soup, salad, entree and desert. The hard part was you only have three hours to complete this while they stare at you. I blew them away in a little over two hours. I wanted to take pictures of every plate but I was so nervous that all I snapped was desert. All I had time for was a chocolate lava cake with raspberry coulis, coco nib tuile and espresso ice cream.
The chef instructors all agreed I should move on to the final portion of the curriculum. This meant I had six months of school left before obtaining my degree! I was very proud of myself. The remaining months of school were great! I have a lot of fond memories of my classmates.
School was over and the world was my oyster! What now? The Inn at Shelburne Farms was next on the hit list. Rick Gencarelli is the most charismatic and talented chefs I have ever worked with. His crew were all veterans and were all very tight. His outlook on food deserves great respect and admiration. Aaron Josinsky , his sous chef was the most incredible personality I have ever seen. To this day I still channel his energy and creativity. His dedication to the profession has no boundaries. I truly respect him for this.

Through a staffing issue I found myself in charge of the kitchen in the morning. Rick explained the pitfalls of this particular shift. There is no way I'm going to let him down! Over time I gained the respect of the kitchen and was able to focus on making food I have never made before. Everything from hand-made breakfast sausage to jelly doughnuts, we got it done! My first year there I had Clay Seacrest as my wingman. There were some difficult times involved. Clay did a tremendous u-turn. By the end of our stay he was pulling off some very good work. Clay has since graduated from CIA and is working in Syracuse, N.Y. Way to go Clay! The second year I had the pirate crew consisting of Joe Mitchel, Josh Brigham, and Colleen Fadden. Once again we seemed to pull off the impossible!
I was sad to see the farm go. It is one of the most beautiful places to work. The amount of positive energy will be missed.
At this point I felt a little spoiled. Food will never be like that again. My mission now is to uphold all the standards of the farm to any future prospect. This is where Monty's comes into play. One of my co-workers was hired as the executive chef of this new restaurant in Williston Vermont. I went in there as his right hand man. Adam Swartz is truly a gifted chef. He operates on a totally different wavelength than everyone else. His menu was brilliant and his ingredients were of the highest quality.
Little did we know that we were suckered in by a scourge named David. He had no intent on letting us produce amazing food. He just wanted to show his golf friends that he could give them free beer and annoy every employee. It was a matter of time....It was him or me! I felt bad for Adam but I had no problem walking right out that door.

I was feeling a little restless again. The thought of moving kept popping into my mind. So I spun the wheel and landed in Baltimore Maryland. I had grand visions dancing around in my head. There is a whole city at my disposal with thousands of restaurants. My first gig was at Brightwood Village. This was a high end community with armed personnel on site at all times. The family that owns McCormick spice lives there! They had a full kitchen with a fine dining menu in place. The staff never cooked before. The chef left this to me. I can't make people want to work. My final day was actually fun! I made desert for the staff with some leftover plantains and phyllo.
I spent a month looking for just the right kitchen. I answered an ad in Craigslist for a private chef. I had the job by the end of the day! I loved making food and helping out the Balsamo family. Paul and Kate both work in education and have an amazing knowledge of food. Paul is definitely happy when he is in front of his grill. Kate loves to open a new cookbook and try recipes to see what works. Too bad more families can't come together like this and eat wholesome food.

Back to Vermont! I worked at Mary's in Bristol......Nope! The Spirit of Ethan Allen.....Hell NO! Which brings us to The Tyler Place. I have never heard of the resort before. It is literally on the Canadian border. I went for my interview with Jeff Towle the GM and Jeremy Ratta who is the executive chef. I had a great time! The property is beautiful! I also love their concept. Chef Jeremy loves to have fun in the kitchen. You can tell when he starts belting out lyrics to his favorite songs. Jeff is probably the nicest general manager ever! Calm, cool and relaxed at all times. It's great to see this duo and become part of the team.

Whew! My fingers are flying. Todays rant is over! Work comes faster than you know it. This along with purchasing a house has left my brain a little rattled.

Peace!

Sunday, June 20, 2010

Fathers Day Fun!


Well its another year in a new kitchen on Fathers Day! I must say that I was pretty excited to give all the guests and employees some of our best food. Today my goal was to change the pickles served with our smoked salmon board. The pickles we use are just loaded with HFCS and other nasty ingredients. I decided to switch from the nasty pickle to my fresh pickle chips. As usual I use the staff as guinea pigs. I expected that they would love it, and they did! This is truly a simple recipe. Once you try making these, all store bought pickles will take a backseat. To start have the right equipment. The purchase of a Japanese mandolin will make your life a whole lot easier. You will be amazed at how useful this tool is. Start out slicing one pound of English cucumbers.
Set the mandolin at its widest setting for slicing. You will litteraly fly through these. Be very careful, the worst injuries I have ever seen on the job have come from not paying attention using a mandolin. Your next task is to peel and slice a half pound of white onions on the same setting.
Combine the cucumbers, onions, 3/4 cup of cider vinegar, 1.5 teaspoons of salt, .25 t of mustard seeds, and 2T of sugar in a stainless steel sauce pot. Gently heat the mixture on a low flame. I use a soft spatula to stir the mixture so I don't mutilate the cucumbers. Keep the mixture moving so the cucumbers wont discolor. While you are doing this have another stainless pot available and combine 3/4 C of white vinegar, 1 t allspice berries, 1 t celery seeds and 1/2 C of sugar. Bring this to a boil. This will not take long. When the vinegar is boiling pour the cucumbers into a container and dump the boiling vinegar on top. Gently stir to incorporate. Don't be alarmed if there does not seem like there is enough liquid. The cucumbers and onions will release enough on their own to make up for this.

Sweet Pickle Chips

1 Pound English cucumbers
1/4 Pound Sliced White Onions
3/4 Cup Cider Vinegar
1.5 teaspoon Kosher Salt
1/4 teaspoon Mustard Seeds
1/2 Cup plus 2 Tablespoons Sugar
1 teaspoon Celery Seeds
3/4 Cup White Vinegar
1 teaspoon Allspice Berries.

This recipe yields one quart


Strawberry Rhubarb Compote
The next adventure of the day was completely random! I saw in our walk-in a ton of rhubarb! Woo-Hoo!! Strawberry rhubarb compote anyone! I do this a little differently than most. I make this compote in the oven. So many times I have made this on the stovetop and the result is a purple bubbly goo that looks so unappetizing! A pastry chef at Shelburne Farms told me about baking compote in the oven. I thought she was crazy! The result amazed me! The color was a deep dark crimson with outrageous aroma and flavor. I was sold! Today I took one pound of rhubarb, peeled and chopped.
Next I stemmed and chopped 2.5 pounds of very ripe strawberries and added this to the rhubarb
Juice four lemons and add that along with 2 cups of sugar to the fruit.
Toss the fruit gently to cover and pour into a stainless baking pan. Wrap the pan tightly with foil and bake at 350 for about 30 minutes. Afterwards, remove the foil and continue baking. Check the compote every five minutes and stir! You will see that this is where the color comes from. Keep doing this until you have reached the desired texture, about 20 minutes.

Using a small handheld mixer, pulse on low to break up the larger pieces of fruit. The colors will darken as the compote cools


Strawberry Rhubarb Compote
1 Pound Rhubarb Peeled and Chopped
2.5 Pounds Very Ripe Strawberries Chopped
2 Cups Sugar
4 Lemons Juiced

Saturday, June 19, 2010

Here it is!


Hello everyone! My name is Ian Hommel and this blog is starting to really come around! Well, the summer season is upon us here in Vermont. Everywhere I go there is nothing but the freshest vegetables, local meats, and berries! Sometimes the trip to the farmers market turns into an all day event! Not that that's a bad thing. The beauty of the culture here in Vermont is that all the local farmers love to have chefs stop by and talk about their products. Making new friends and respecting the hands that nurture your food is a very satisfying feeling.
Well, about me.. I have been a chef for seventeen years and have cooked my way across the country and back. I am currently the head morning chef for The Tyler Place in northern Vermont. Before this change I was lead AM chef at The Inn at Shelburne Farms, and worked for Relais and Chateaux for a number of years. Along the way I was everything from a rounds chef to a personal chef. I always love the adventure of the road and finding the freshest ingredients in all of these new venues! Over the years I have really come to appreciate charcuterie. In this day and age it has become a dying art. In this blog I hope to show the adventurous home cook or the aspiring professional the simple elegance of preparing and presenting this realm of the kitchen. Thanks, and enjoy!