
Once you have the sausage machine of your choice it's time to buy casings. You have to buy these from a specialty company. I use natural casings from sausagemaker.com. A large container of casings will net you about 100 pounds of fresh sausage. If you take care of your casings they will last until the apocalypse. Just be sure to salt the leftover casings heavily and refrigerate. I love sheep casings at 1/4" for breakfast sausage or merguez, and hog casings at 1 1/2-2" for grilling sausages. Today I made sweet and hot Italian sausage for our weekly cookout at The Tyler Place.
Start out by stopping by your local butcher and picking up some fresh pork shoulder or butt with skin on. While you're there see if you can get your hands on some fresh pork belly or fatback. Don't be intimidated by breaking down your own meat. It's a very satisfying feeling making these sausages from start to finish without help from the corporate farms. Start by slowly breaking down the shoulder or butt with a sharp knife and remove the skin and bone. If possible, try to scrape any of the subcutaneous fat that my be attached to the skin. You can't have great sausage without the fat! Cut the meat and fat pieces into cubes and refrigerate. It's important to keep the meat cold. If you were able to buy fatback or belly the ratio I use is for every four pounds of meat add one pound of fat. Set up your grinder and process the fresh pork and fat together and immediately refrigerate. Here is the ingredient list for hot and sweet Italian sausage.
Hot Italian Sausage
-4.5 lbs Pork Shoulder or Butt
-1 lb Fatback or Belly
-3 Tablespoons Kosher Salt
-2 Tablespoons Sugar
-2 Tablespoons Fennel Seed
-1 Tablespoon Coriander Seed, Toasted
-3 Tablespoons Hungarian Paprika
-4 Tablespoons Fresh Oregano
-4 Tablespoons Fresh Basil
-2 Tablespoons Red Pepper Flakes
-1/2 Teaspoon Cayenne Pepper
-2 Teaspoons Ground Black Pepper
-1/4 Cup Red Wine
-3/4 Cup Cold Water
Sweet Italian Sausage
-4 lbs Pork Butt or Shoulder
-1 lb Fatback or Belly
-3 tablespoons Kosher Salt
-2 Tablespoons Sugar
-2 Teaspoons Chopped Garlic
-2 tablespoons Fennel Seeds
-2 Teaspoons Black Pepper
-2 Tablespoons Sweet Paprika
-3/4 Cup Ice Water
-1/4 Cup Port
Have your spices scaled out before mixing with your meat mixture. This will save a lot of time and eliminate mistakes. Place the correct amount of meat in a mixing bowl and use your fingers to incorporate the spice and the meat. For larger batches a Kitchen Aid mixer will come in handy! Once the spice is mixed put the meat back in the refrigerator.
Now it's time to rinse casings! Carefully pull casings out of the bundle they give you. Don't worry, it may look like a time consuming project but it's not. Pull individual casings until they stop and cut. Pretty easy! Run cold water around them to remove any packing salt. Find the opening at either end and pass water through the casing. Leave a little water inside the casing to ease the threading process. Fill the canister with sausage mix! This is the point where I like to have a glass of wine!


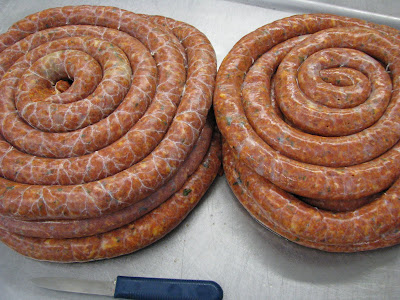
Once you have one length of casing on the extruder, and the cylinder full of meat start to crank the handle and fill the casings. Use your fingers to control the flow of casing being applied. Occasionally stop and wind the sausage up.

Now that you're finished take a deep breath! If you have friends over you will all be laughing your asses off! This is the perfect rainy day kitchen project with friends! Think about the size of the link you want. I use a piece of tape on the countertop to help me with this. When you're first starting out go slow! Pinch the size of the link and roll it away from you. Move up to the next and roll it towards you. Repeat this over and over again until you are finished.


Use a pair of scissors to separate the individual links. They freeze well, so don't feel bad about making too much.

Let the sausage rest for a little while before cooking. The meat and the casings have been through a lot! Every time you make sausage you will become a little faster each time. I have made it so many times that I crank the handle as fast as I can. You'll be there someday! Next time you walk through the supermarket and see those sad excuses of sausage you can feel good knowing that you can produce a product that these big corporations can't touch! Enjoy! Email me if you have any questions!
Cheers!
No comments:
Post a Comment