Tuesday, August 24, 2010

Kamikaze Pickling

Wow! Today was very productive! I recently came into some fresh local green beans from Freedom and Unity Farm, FU Farm for short! Ha! These beans were so good. It would only be right to preserve them so I can enjoy three different types of dilly beans well into the winter. First, I had to snip the little stems off all the beans. This was the longest part of the project. With this many beans it took about one hour and ten minutes.


Next came peeling four heads of garlic, sterilizing three cases of Ball preserving jars and lids, cleaning nine heads of dill, scaling ingredients and heating up the canner. This is when I realized that today's project was going to be a major undertaking. So, it was time to pour a glass of wine and get to work!

My canner can only work in six jar batches. This actually turned out to be OK so I don't overwhelm my counter space. The processing time for six jar batches was twelve minutes when you throw elevation into the equation.

The whole process took about 6.5 hours, and will give months of different kinds of pickled beans. I even found a little surprise inside my fridge! There was a bag of cherry peppers hiding behind some carrots! Well, they were quickly prepared and preserved too.


As you can see, I will be eating dilly beans till Spring! The best part is that I made each one different. There will be a surprise waiting in every jar! The master recipe is located a few blog entries back. Eat lots of beans and have fun!!

Thanks Misha!

Tuesday, August 10, 2010

For Joan

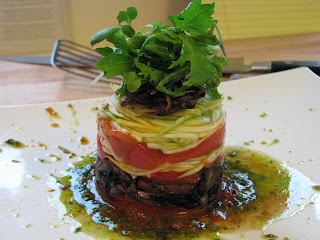
This latest installment is for my good friend Joan.  Yesterday evening I was still reeling with dog issues when she called and rescued me from my turmoil.  So, as promised, here is the recipe for my vegetable napoleon.  These kind of dishes vary from chef to chef.  With this particular dish, try to use tender veggies. If you use root vegetables, blanch them in boiling salted water first.  Either way, this is a solid dish to prepare in little time.

First, I love to start with caramelizing one red onion.  You can slice it any way you want as long as it is thin.

Use a small saute pan without oil and bring to high heat.  Many people use non-stick pans but.... they suck.  The trick is to bring the pan to a high temperature before adding oil.  Metal is porous and ragged before heating.  Applying heat expands metal and closes all those little jagged parts for a smooth surface.  At that point add your olive oil.


Now for the fun part!  Add the onions and quickly lower the heat by half.  All stovetops vary, you just want a light hissing sound.  This process will take about fifteen minutes or so.  During this time occasionally move the onions around to prevent scorching.


When the onions start to have a pink hue and the edges are a solid brown, turn the heat off but leave the onions there.  They will continue to cook for a few minutes without having to worry about burning them.

That is the component for at least two layers in the napoleon.  Next, I have some very fresh squash and zucchini from the Intervale.  You can slice them into thin rounds, but today I used my mandolin to make zucchini and squash noodles.

This will add that tender crunch we all love.  A Japanese mandolin is a prized piece of equipment in any kitchen, especially for veggies.  Next, I had a bunch of crimini mushrooms in the fridge.  This will add a nice earth flavor.  As before, slice thin and saute in a little olive oil.  This has a twist.  I usually open a nice bottle of wine (sauvignon blanc)  and pour a glass.  After a few minutes the mushrooms need a drink too!

I have to admit.  I cheated a little for this next part.  I love roasted peppers, but a good product in a jar is more than adequate.  That's it! Everything is done.  Now comes the fun part!  For this I used a ring mold.    I have had this for years.  If you go to Home Depot and buy a piece of aluminum tubing cut into 4" pieces, this will save some time and enhance appearance.  Press in the onions and mushrooms with a spoon.


Add the squash, zucchini, mushrooms and peppers to form distinct layers.  Today I used fresh pesto and sundried tomato tapenade.  These work perfectly with the ingredients.  To get the "stipple" effect hold the spoon at least a foot above the plate and pour slowly.  Use a spatula to hold underneath the ring mold and place in the middle of the design.  You can top with some baby salad greens.  I know it seems like a lot, but when you put it in perspective it's not.


Thanks again Joan!  You really helped me yesterday.  I hope you enjoy the recipe!  Let me know if there any questions.

Saturday, August 7, 2010

Dilly Beans and Fresh Bacon

Today was one of the nicest days of the summer. Even the sunlight seemed different today. Here in Vermont you definitely can feel the season changing. This morning I took out the motorcycle and saw so many trees starting to change color on Appalachian Gap. Afterwards I went for a bicycle ride on my favorite trails and witnessed the same here in the Champlain Valley. The air was right.... Today is a great day for playing in the kitchen. I had two pounds of fresh beans from Lewis Creek Farm and of course pork belly. First, I love dilly beans. Seriously, I turn into Tyrone Biggums looking for some rock if I don't have it at least once a year. These are so easy! Everyone should be making them. Here is my recipe....

Dilly Beans

-2# Fresh Green/ Yellow Beans
-4 Cups Cider Vinegar
-2 Tablespoons Kosher Salt
-4 Garlic Cloves, Sliced
-8 Sprigs Fresh Dill
-1 teaspoon, Red Pepper Flakes

First things first. Have a large pot of water on the stove over high heat. There is nothing worse than waiting for water to boil. They say a watched pot never boils, but I disproved that theory today. It will eventually boil.


Make sure you snip the little stems off the beans, and gather your ingredients before you blanch them.


Blanch the beans for about 3 minutes and quickly transfer them to an ice bath to stop the cooking. Take the vinegar and remaining ingredients and place in a small sauce pot and bring to a boil.


If you dont have your jars already free from bacteria, place the cleaned jars in the oven at 200 degrees for a few minutes before packing them. When you're ready pack the jars with the blanched beans and dill.


Make sure the jars are not overfilled. If so the jars won't seal properly, or worse, break. Place the lids on and gently tighten them. While the jars are hot, rev up the canner! Holy CRAP! As I am typing this a hot air balloon just crashed in my backyard!!! That is strange! Well, the fire department can deal with a basket full of tourists. Back to the beans!

When the water in the canner has come to a full boil put the jars inside and process them for twelve minutes. Carefully remove the jars and let cool on your countertop. Put them in your pantry and enjoy!


Next project was fresh bacon. Two of the greatest ingredients in life are fresh bacon and good olive oil. Fresh local pork belly=GOOD BACON!!

***Balloon Update... They are out of my trees and stuck in the neighbors yard.. Good!***

The dry cure mixture for bacon is....

Basic Dry Cure

-1 Pound Kosher Salt
-8 Ounces Granulated Sugar
-2 Ounces Sodium Nitrate

Mix all of the ingredients listed well.


To make this bacon extra special, you have a few options. My favorite is adding three sliced cloves of garlic and 1 tablespoon of cracked black pepper.

Dredge the pork belly in the salt and sugar mix and rub the cure mix in with your fingers. After, add the black pepper and garlic and work that into the belly.

You will have at least one quart of dry cure mix leftover. Save this! You can use it on many cuts of meat. It especially works well on pork ribs. Let the bacon sit in the fridge for nine days. Once its ready, hang on to your socks! Or, you can freeze it for three months, but why torture yourself!


Bacon truly is the gateway meat!

Thursday, August 5, 2010

Back In Business!!


Last Saturday I was milling around Healthy Living Market in So. Burlington. Their meat department is outstanding! The first prize I saw was a pile of fresh pork belly from Settlers Farm here in Vermont! Well....I fought off about one million screaming Chinese women and cleaned them out! I'm sitting on about 60 pounds of pork belly! Woo Hoo!!!!! Ok, Pancetta is first on the hit list! Pancetta is basically Italian Bacon and is great to use in EVERYTHING!! It is basically pork belly cured with salt , seasonings and then dried for a week or two. If you are fortunate enough to get your hands on fresh pork belly keep this recipe in mind! Here's what you need......

3 Garlic Cloves, Minced
1 teaspoon Sodium Nitrate
1 ounce, kosher Salt
1 Tablespoon Dark Brown Sugar
2 Tablespoons Crushed Black Pepper
1 Tablespoons Juniper Berries, Crushed
2 Bay Leaves, Crumbled
1 teaspoon Nutmeg, Ground
3 Sprigs Thyme, Chopped
2.5 # Pork Belly

Get everything together..Mise en Place yo!


First thing is to cut the amount of black pepper in half and reserve. Mix all the seasonings together and liberally coat all sides and work it into the meat.


At this point you can either wrap the curing pancetta in plastic wrap, or you can seal it in a Foodsaver bag.


Let this sit in your fridge for seven days. Every day carefully flip the bag over to redistribute the brine. The meat should firm up as it looses moisture and takes on the applied seasonings. When the days have past, remove it from the bag, rinse with cold water and rub in the reserved black pepper. Let this sit uncovered in the fridge for three days. Drying pancetta helps the texture, intensifies flavor, and makes it last longer. Here is where you should be at after seven days.....


I'll update this blog in the later stages of the curing process. Stay tuned!!

Ok, todays project was dinner. The options at this point are wide open. I felt the strong urge to fire up the smoker. The options were short ribs, salmon, scallops, beef back ribs, pork loin or chicken. They all drew straws and chicken won! Before you attempt this, first buy a good smoker. I'm very particular about smokers and will never buy a gas model. It doesn't seem right!

For this I used a local split whole chicken. Not only is this dinner for tonight, but great for leftovers..Hmm...Chicken salad with champagne grapes!!!! First, take the bird and coat it lightly with blackstrap molasses.
Next lightly sprinkle maple sugar all over the bird. After that crush about one tablespoon of black peppercorns and work that into the mixture.


You definitely need some heat with this bird. Sriracha is a welcome addition to smoked maple black pepper chicken.

The Money Shot!

As soon as you're done grab two chunks of your favorite wood to smoke with. In my case it is fresh apple. Take the wood and submerge it in a 50/50 split of vinegar and water until saturated.
Let at least thirty minutes pass before you light your coals. Add the soaked wood to your hot coals and close the damper almost all the way. Once it starts smoking, place your little lady in waiting on the other side of the grill for indirect heat.


Make sure that the bird is fully cooked. It took about 40 minutes at 230 degrees. For tonight while this was cooking I made a quick bean ragout and toasted baguette.


It is well worth the effort! I'm still eating this while typing and enjoying every minute! It's so good that time seems to stand still. It's funny how food can do that to you.

-Peace